
Section 1.4.1 - How To Configure A FocusLynx Commander Serial Connection
WARNING: Do not plug any focuser into your focuser hub until you have completed the Set Focuser Type step described below. If you do not wait, you may cause severe, permanent focuser damage.
FocusLynx Commander is a suite of focuser hub control tools developed by Optec specifically for use with the FocusLynx focuser hub. To configure this software to operate over a serial connection, follow the directions below:
- Install And Open FocusLynx Commander - Follow the Software Installation instructions to install and open this control software.
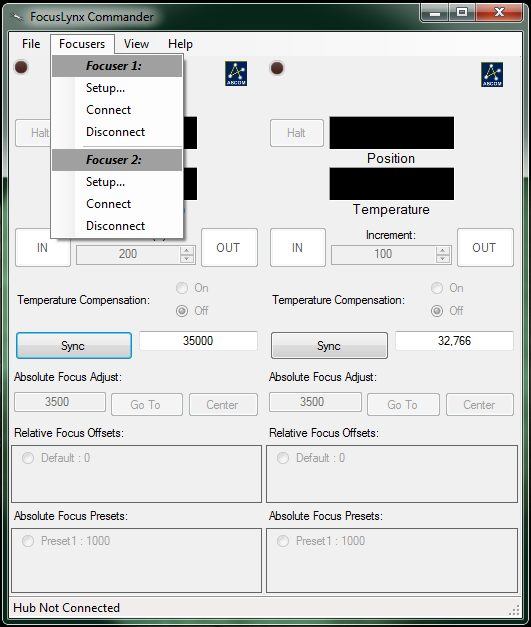
- Go To The Setup Screen - Once FocusLynx Commander is open, go to the Focusers menu and choose the Setup option under Focuser 1 or Focuser 2, depending on which focuser you want to configure. The setup screen will open. If you wish to leave the setup screen at any time without changing any settings, click the Cancel button at the bottom of the window. If you wish to reset this focuser's configuration to factory defaults, click the Restore Defaults button.
- Plug In Your Focuser Hub - Ensure that there is a serial cable connection between your computer and the FocusLynx focuser hub and that the hub has a valid 12VDC power connection. Slide the switch up on the side of hub to power on, you should see the red LED illuminate.
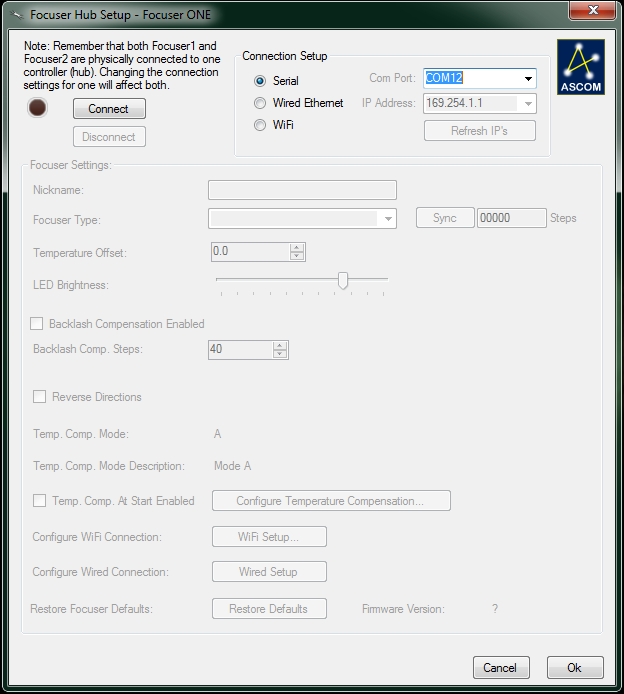
- Connect To The Focuser Hub - Verify that the Connection Setup selection is set to Serial and the Com Port setting is set to the port into which your hub is plugged, then click the Connect button. If you are not sure which COM port your focuser hub is plugged into, guessing and checking among the available options should work, as there will be very few COM ports on any given computer. If you encounter persistent problems determining which COM port to use, contact Optec for assistance.

- Confirm Connection - The red LED simulation should turn on, indicating that the connection has been established.
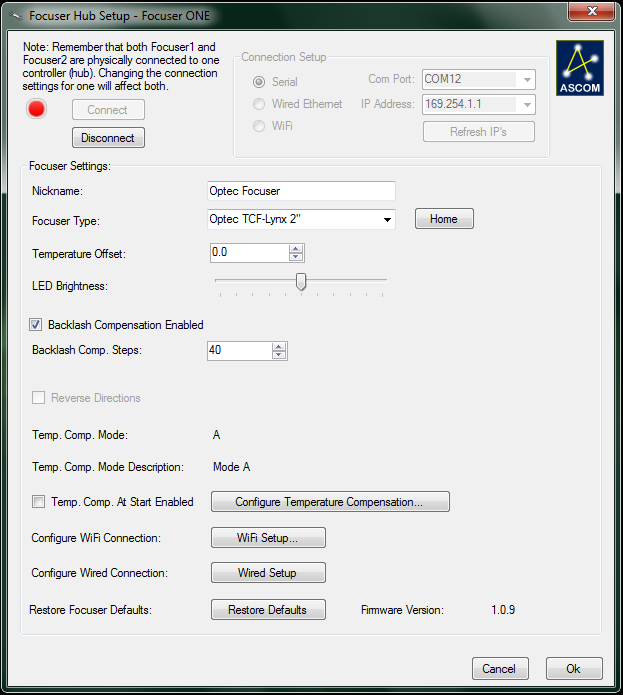
- Set Nickname - It might be a good idea to identify which focuser or telescope is associated with Focuser 1 and Focuser 2. You may set the focuser nickname by entering any description into the Nickname text box.
- Set Focuser Type - If the focuser type auto-generated by the Commander is incorrect, select your focuser type from the Focuser Type drop-down list. Be aware that your focuser will home itself automatically if you have an absolute focuser when the focuser type is selected, so you will lose your current focus position.
- IMPORTANT: You May Now Connect A Focuser To Your FocusLynx Hub
- Home The Focuser - If you want to start the focuser at its factory-set "Home" position, click the Home button.
- Sync The Focuser - If you would like to sync your focuser to a particular step position, enter the step position and click the Sync button.
- Set Temperature Compensation Offset - The digital temperature sensors used in the temperature probe are very precise but not necessarily very accurate. If the reported temperature varies a few degrees from the actual ambient temperature, you may use the Temperature Offset text box to apply a positive or negative adjustment within a range of plus or minus 10 degrees Celsius. Contact Optec if your temperature probe varies more than a few degrees from the actual ambient temperature.
NOTE: Remember that temperature compensation relies upon temperature differentials only and not absolute temperatures. Be sure to affix the temperature probe to the telescope tube as it is only the actual telescope temperature variation that will affect focus.
- Adjust LED Brightness - If you find the focuser hub's power indication LED adversely affects your night vision, you may adjust its brightness with the LED Brightness slider. The range of brightness varies from left to right, starting with no light at all and moving to full brightness.
- Enable Backlash Compensation - If your focuser has a noticeable amount of backlash, check the Backlash Compensation Enabled checkbox to enable compensation.
- Set Backlash Steps - Enter a number of steps into the Backlash Comp. Steps text box to adjust to the level of backlash compensation your focuser requires. You may set the number of steps to a maximum of 99 steps in the OUT direction only.
- Reverse Directions - Reverses the direction of the focus motor for use with focusers with different gearing.
- Temperature Compensation Mode and Description - Displays which temperature compensation mode is selected.
- Immediate Temperature Compensation - If you want to begin temperature compensation immediately upon opening FocusLynx Commander, check the Temp. Comp. At Start Enabled checkbox.
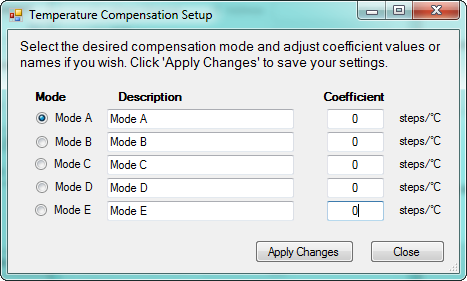
- Configure Temperature Compensation Settings - If you have a temperature compensating focuser with a temperature probe plugged in, you may click the Configure Temperature Compensation. If you already know your system's unique temperature coefficient you can select a Mode, enter a name in the Description, enter a Coefficient, and then Apply Changes to save your changes. Alternatively, you may choose to run the Temperature Compensation Wizard to determine your optical system's unique temperature coefficient. See Temperature Coefficients if you need to determine you temperature coefficient using the wizard.
- Confirm Your Configuration - When you are finished, click the Ok button to save your changes and return to the main FocusLynx Commander window.
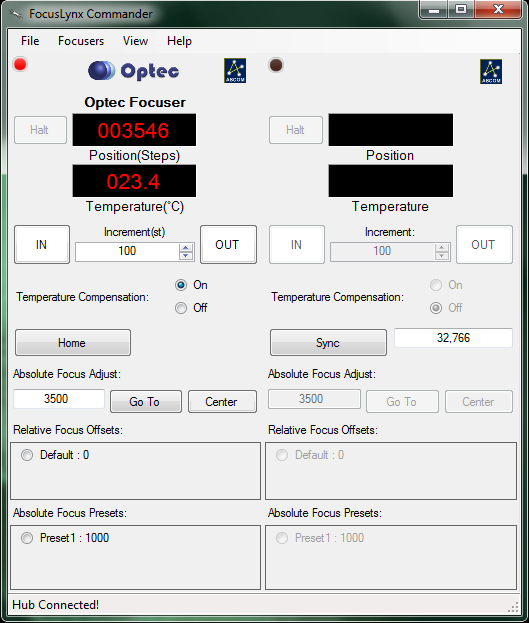
Congratulations! Your hub and focuser are now ready to use! You may use the current configuration to connect or disconnect from a focuser by clicking the Connect or Disconnect buttons in the Setup Window, the Connect or Disconnect buttons in the Focusers menu of the main window, or by clicking the LED above each focuser information display in the main window.


