Section 3.1.1 - Configuring USB-To-Serial Converters
The FocusLynx package includes a special USB/Serial Cable designed by Optec to work with nearly all Optec serial devices. The device used in the cable is based on the FTDI chipset. Most current operating systems include native drivers for these USB-to-serial converter devices. Windows 7 and higher will automatically load the proper device driver upon initial use. The very latest drivers for Windows and Mac are available directly from the Optec and FTDI websites.
Generally, the FocusLynx Commander software will list only valid and available COM ports in the Connection Setup section of the Focuser Setup dialog boxes. However, if you are unsure which COM port has been assigned to your USB/Serial cable or USB-to-Serial converter, you may need to check the Device Manager in Windows. The instructions for Windows XP below provide the easiest way to install the converter drivers and configure the USB-to-Serial port converter when using an older operating system. Windows 7 and newer operating systems do not generally require the steps below, but will quickly locate and load the proper device driver when plugging the USB/Serial Cable into a USB port.
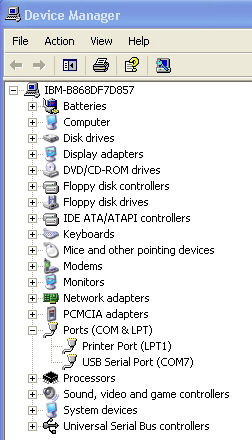
To display the Device Manager in Windows, click Control Panel on the Start menu, or right-click on the My Computer icon and select Manage. Select Device Manager under System Tools.
- Remove Old Drivers - Before plugging your new converter into your computer, make sure that any existing old drivers for the FTDI chips set have been removed. Do this by going to the Add/Remove Programs in the Control Panel and find any listing of FTDI drivers and remove it. If you have any older USB-to-Serial Converters using the FTDI chip set, you can remove them now.
- Download And Install New Drivers - From the Optec Install disk or from the Optec Downloads page, at download and run the FTDI driver executable setup program. This setup program is compatible with Windows XP, Vista, and 7. You will not see any message if the program loads successfully.
- Plug In Your Converter - After running the setup program, you can now plug in one of your FTDI chip set USB-to-Serial converters.
- Open Device Manager - To find the COM number that was selected for each USB-to-Serial converter, go to your Device Manager by clicking the Control Panel option on the Start menu, and selecting Hardware and Sound, followed by Devices and Printers -> Device Manager.

- Find The Converter Port - Browse the list of devices to see the COM port number listed under Ports (COM & LPT). In the diagram above, the USB-to-Serial Converter is using port COM7. You can then plug your other converters in one at a time to see which COM numbers have been selected for those.
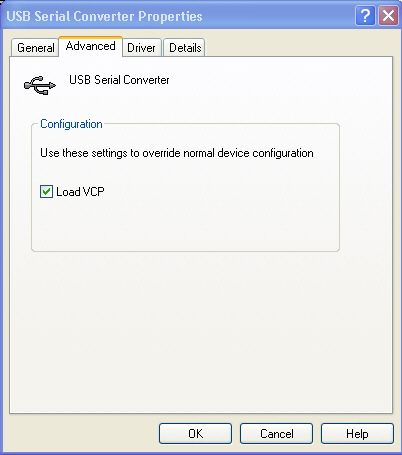
- Additional Modification May Be Necessary - If you purchased your converter from Optec before July 2007, you may have to modify an additional setting. If you do not see the COM port number in the Device Manager screen as above, but do see messages that indicated that the USB-to-Serial converter is installed and ready, then right-click the USB Serial Port device and select Properties.

- Check The Checkbox - Select the Advanced tab in the properties window and check the Load VCP box. Unplug the USB-to-Serial converter and then plug it back in. You should see the COM port number appear under Ports. This will affect all converters connected to the computer.


